If you like lynx, you will love Elinks. It has direct mouse support, frames and tables, menus (even pop up menu), within your text terminal. Oh, did I mention it also supports tabbed browsing? (better than IE6, ha ha...)
Besides Midnight Commandar, this is another cool text (or cli) mode application with good mouse support. Anyone know any others?
Thursday, June 09, 2005
Monday, June 06, 2005
Backspace + Screen + Vim + PuTTy in FreeBSD
If you use putty to ssh to FreeBSD, you will notice the backspace key won't work in vim in insert mode. The easiest solution is set the backspace to Ctrl-? in your putty setting.
Now when you starting working with gnu screen, you will met another problem. The Ctrl-? backspace now shows as ~ in your shell prompt. If you set the putty back the Ctrl-H, it will works again.
So what should we do if we want to use vim inside screen, through PuTTy in a FreeBSD environment? The solution is, use Ctrl-H in your PuTTy, and add the following code to your .vimrc file:
:if &term == "termname"
: set t_kb=^V
: fixdel
:endif
The above code is copied from vimdoc.
Sunday, June 05, 2005
GNU Screen
GNU Screen enables you to work in multiple sessions in single a telnet/ssh sesion. After you have installed it :
- run screen. Now you are presented still in your shell prompt as usual. Ctrl-a c will create another new session.
- Ctrl-a " will list all your session. Use arrow key to select one, enter to goes to that session.
- Ctrl-a A will prompt you a name for the current session.
- Ctrl-a w will shows you some info of all sessions.
- Ctrl-a Ctrl-a toggles between current and previous session.
- Ctrl-a d will detach the curren screen sessions, and goes back to your original shell prompt. In fact if you are in a remote terminal, just close your terminal emulation app will achive the same effect. After detached, screen -ls will list all the detached sessions. screen -r will restore the first one. screen -d -r will try to detach the session, then attach it. (Good for detaching the session from another remote terminal, and steal it to current one). Think about it, it's really handful!
- For help, Ctrl-a ?
- Hint: If you usually set your bash setting in .bash_profile, you can make a symbolic link of .bashrc back to this file. This way, when screen invokes bash, it will read back your profile setting.
- Hint: If you see ~ appearing when pressing backspace key, it means your terminal emulator is setting wrong. For PuTTy, change it to Ctrl-H.
Don't use vim just as vi
Most Linux nowadays comes with vim instead of vi. But many people just keep using vim as vi. (I am one of them, how about you?) Actually when I first met vim, I am excited, and try to learn all those new techniques. But later on, as using GUI editor much more often, I forgot everything. :x
Below are some difference that I think vim really stands out:
0. Visually copy/cut/paste!
- just type v to start visual mode. Then navigate to whereever you want. This will creates a marked block. Just type 'y' for yanking (copy), or 'd' for cut. Move your cursor to elsewhere, then 'p' to paste your text!
- 'V', will start marking lines
- Ctrl-v will start block mode marking!
- During cursor movement, 'o' will move to the other corner of your current cursor
- For block Visual mode, 'O' moves to the other corner, in the same line
- 'gv' highlight back the previous marked area.
- In addition to yank(y) and delete (d), you can also perform change 'c', 'I' for insert, 'A' for append. For block mode, this means you are repeating what you change for the marked areas. Pretty cool.
1. Resizable windows
- To split current session to two horizontal windows, :split
- To jump your cursor location from one to another, Ctrl-w w (or Ctrl-w Ctrl-w)
- To close one of the window created by split, just Ctrl-w c
- The usual jkhl navigation key works as expected, just add Ctrl-w before it. e.g. Ctrl-w j will move your cursor to the window below your current one.
- To create a new window of a new file, :new
- Ctrl-w + (don't just press the '=' for +, you need to add a shift key!) increase your current window by one row. Type a number before Ctrl-w will repeat this action. So 5 Ctrl-w + increases 5 rows. Similarly, Ctrl-w - will decrease by one.
- <N> Ctrl-w _ will set your current window to <N> rows. Ommitting will maximize your current window as large as possible, but still keep other windows there.
2. File browsing
- : edit <filename> (e <filename> will also do) will try open another file. You will be warned if you havent' save your current file. Also note that you can perform filename completion by pressing <Tab> key.
- Even better, for vim 6.x, edit . will brings you the directory listing. The usual vi navigation (jkhl) keys works as expected. You can perform / search. Just press enter for a directory name will navigate to this directory. Pressing enter for a file will start edit this file. 'D' (capital D) will delete the file, don't worry, it will ask you to confirm.
- You can keep editing another files during your session by using :edit , but just you need to save before moving to another. If you don't want to save yet, try :hide edit filename . (type hid instead of hide will also do.)
- Vim keeps a buffer list of all the editing sessions, and assign a number to each buffer. To view all the buffers, :ls When you knows the buffer number, you can switch to this file by :buf <N> (or even just :b <N>). Still , add hid before if you don't want to save for the moment. In the buffer list, '#' means your current session, '+' means modified session.
- Another way to switch between buffer number is <N>Ctrl-^ (press Ctrl-6), where <N> refers to the buffer number.
- To quickly leave all sessions without saving, :qa!
3. text completion
- Ah, this is really cool. Keep pressing Ctrl-N will goes through all possible strings appears in your current session.
4. Tag list
- The Taglist plugin shows all the functions/scope in another window, just like Function Lists in PsPad/Ultraedit. It will also show the buffer list at the top for easier navigation. Cooo...l!
5. Undo/Redo
- You know 'u' will do undo. For vim, you can perform multiple undo <N>u
- The other way round, Ctrl-R perform redo.
5. Insert mode change
- under insert mode, you can move around using cursor, and keep inserting text. No need to type <Esc> i
6. Marks and Jumps
- To create a mark: m[a-zA-Z] lowercase marks will lost when the current file is removed from buffer list. Upper case marks won't.
- To return to marked: either use ' or ` , follows by the marked character. e.g. 'c
- To view the mark list, :marks
- Whenever you perfrom any jumping actions (like ', /, G etc.), a new jump list is created. To view jump list, :jumps
- Use Ctrl-o for to goes up the jump list, use Ctrl-i to goes down the jump list
7. Search/Replace
- To perform global replace, with confirmation :%s/pattern/replacement/gc
where % means perform on all lines, g is multiple time in each line, c means confirm.
- just pressing * will search the word under cursor. g* search for partial match. # search in backward direction, while g# search for partial word in backward direction.
8. Command Line Editing
- To edit another file, :e , then press <TAB>, this will
show the first file in current directory. This is vim word completion. Keep pressing TAB gives you more files in the internal list in forward direction. To get back the reverse direction, Ctrl-P. Press Ctrl-D will show the whole list for overiew.
- For set option, in addition to the option keyword completion, if you TAB after =, vim will even auto complete with the current option value.
- Under command line, you can Ctrl-P to show your command history. After you press at least one time of Ctrl-P, you can use Ctrl-N to go forward the history again.
- q: will open a command line window. The usual jkhl keys works, and you can edit any line. After you have modify any available command line (or just go to the line w/o editing), press enter. Bingo, this command is executed, and the command line window is auto closed.
Misc. Hints
- To scroll your page one line at a time, use Ctrl-Y and Ctrl-E
- change your vim init setting in your ~/.vimrc
- If you use screen with vim, you can change your .bash_profile (or .bashrc) to set TERM=xterm-color. This will allow mouse=a setting to work. FYI, default screen TERM is set to 'screen'.
Below are some difference that I think vim really stands out:
0. Visually copy/cut/paste!
- just type v to start visual mode. Then navigate to whereever you want. This will creates a marked block. Just type 'y' for yanking (copy), or 'd' for cut. Move your cursor to elsewhere, then 'p' to paste your text!
- 'V', will start marking lines
- Ctrl-v will start block mode marking!
- During cursor movement, 'o' will move to the other corner of your current cursor
- For block Visual mode, 'O' moves to the other corner, in the same line
- 'gv' highlight back the previous marked area.
- In addition to yank(y) and delete (d), you can also perform change 'c', 'I' for insert, 'A' for append. For block mode, this means you are repeating what you change for the marked areas. Pretty cool.
1. Resizable windows
- To split current session to two horizontal windows, :split
- To jump your cursor location from one to another, Ctrl-w w (or Ctrl-w Ctrl-w)
- To close one of the window created by split, just Ctrl-w c
- The usual jkhl navigation key works as expected, just add Ctrl-w before it. e.g. Ctrl-w j will move your cursor to the window below your current one.
- To create a new window of a new file, :new
- Ctrl-w + (don't just press the '=' for +, you need to add a shift key!) increase your current window by one row. Type a number before Ctrl-w will repeat this action. So 5 Ctrl-w + increases 5 rows. Similarly, Ctrl-w - will decrease by one.
- <N> Ctrl-w _ will set your current window to <N> rows. Ommitting
2. File browsing
- : edit <filename> (e <filename> will also do) will try open another file. You will be warned if you havent' save your current file. Also note that you can perform filename completion by pressing <Tab> key.
- Even better, for vim 6.x, edit . will brings you the directory listing. The usual vi navigation (jkhl) keys works as expected. You can perform / search. Just press enter for a directory name will navigate to this directory. Pressing enter for a file will start edit this file. 'D' (capital D) will delete the file, don't worry, it will ask you to confirm.
- You can keep editing another files during your session by using :edit , but just you need to save before moving to another. If you don't want to save yet, try :hide edit filename . (type hid instead of hide will also do.)
- Vim keeps a buffer list of all the editing sessions, and assign a number to each buffer. To view all the buffers, :ls When you knows the buffer number, you can switch to this file by :buf <N> (or even just :b <N>). Still , add hid before if you don't want to save for the moment. In the buffer list, '#' means your current session, '+' means modified session.
- Another way to switch between buffer number is <N>Ctrl-^ (press Ctrl-6), where <N> refers to the buffer number.
- To quickly leave all sessions without saving, :qa!
3. text completion
- Ah, this is really cool. Keep pressing Ctrl-N will goes through all possible strings appears in your current session.
4. Tag list
- The Taglist plugin shows all the functions/scope in another window, just like Function Lists in PsPad/Ultraedit. It will also show the buffer list at the top for easier navigation. Cooo...l!
5. Undo/Redo
- You know 'u' will do undo. For vim, you can perform multiple undo <N>u
- The other way round, Ctrl-R perform redo.
5. Insert mode change
- under insert mode, you can move around using cursor, and keep inserting text. No need to type <Esc> i
6. Marks and Jumps
- To create a mark: m[a-zA-Z] lowercase marks will lost when the current file is removed from buffer list. Upper case marks won't.
- To return to marked: either use ' or ` , follows by the marked character. e.g. 'c
- To view the mark list, :marks
- Whenever you perfrom any jumping actions (like ', /, G etc.), a new jump list is created. To view jump list, :jumps
- Use Ctrl-o for to goes up the jump list, use Ctrl-i to goes down the jump list
7. Search/Replace
- To perform global replace, with confirmation :%s/pattern/replacement/gc
where % means perform on all lines, g is multiple time in each line, c means confirm.
- just pressing * will search the word under cursor. g* search for partial match. # search in backward direction, while g# search for partial word in backward direction.
8. Command Line Editing
- To edit another file, :e , then press <TAB>, this will
show the first file in current directory. This is vim word completion. Keep pressing TAB gives you more files in the internal list in forward direction. To get back the reverse direction, Ctrl-P. Press Ctrl-D will show the whole list for overiew.
- For set option, in addition to the option keyword completion, if you TAB after =, vim will even auto complete with the current option value.
- Under command line, you can Ctrl-P to show your command history. After you press at least one time of Ctrl-P, you can use Ctrl-N to go forward the history again.
- q: will open a command line window. The usual jkhl keys works, and you can edit any line. After you have modify any available command line (or just go to the line w/o editing), press enter. Bingo, this command is executed, and the command line window is auto closed.
Misc. Hints
- To scroll your page one line at a time, use Ctrl-Y and Ctrl-E
- change your vim init setting in your ~/.vimrc
- If you use screen with vim, you can change your .bash_profile (or .bashrc) to set TERM=xterm-color. This will allow mouse=a setting to work. FYI, default screen TERM is set to 'screen'.
Remember TC++?
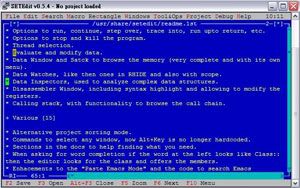 Remember long long time ago, DOS C/C++ programmer like to use TC++(Turboo C++)? I am one of them. :P Even nowadays when I use PsPad or Ultraedit, I still use back the plain color theme: yellow text color on blue background.
 If you use putty a lot, and miss TC++, then look no further with SetEdit. Mouse support, menus, windows resize, and all those familiar TC++ interface is back to Linux.
Subscribe to:
Comments (Atom)